Python Graphs

Python Graph Cookbook
PPC
code
data science
digital marketing
quantitative marketing
intelligence
Author

Oren Bochman

Published

Sunday, August 29, 2021

Modified

Sunday, May 1, 2022

Some tricks collected from the SO and the web

Images

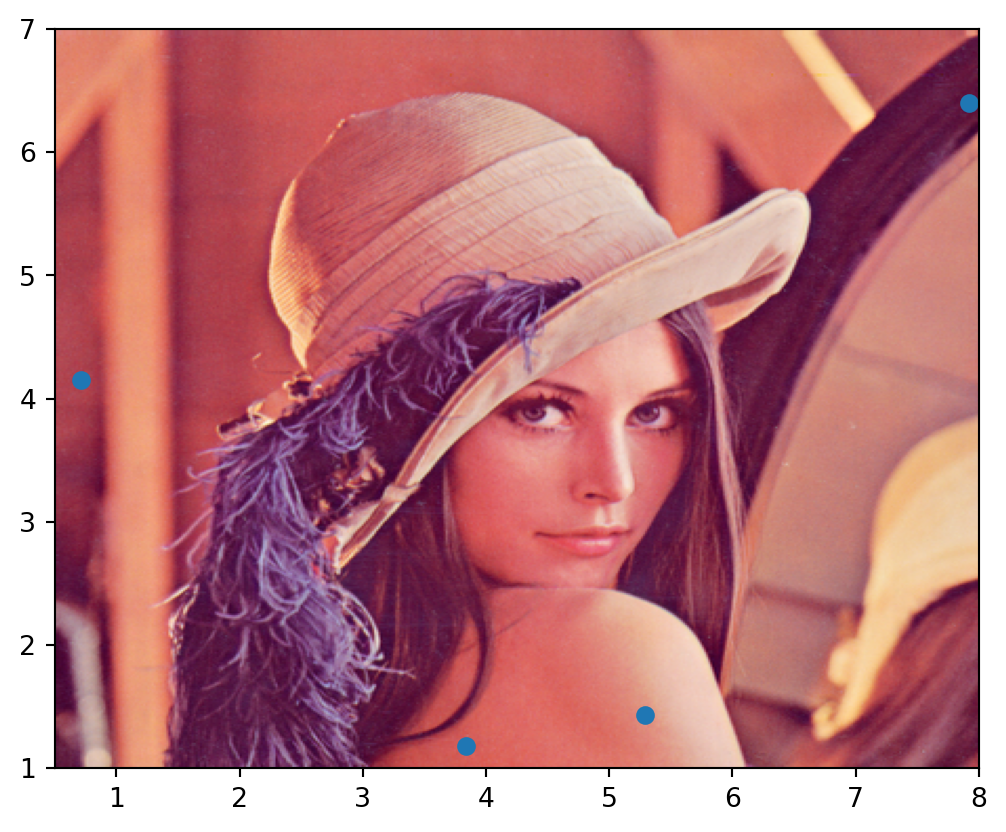
How to use an image as a background

import numpy as np
import matplotlib.pyplot as plt
np.random.seed(0)
x = np.random.uniform(0.0,10.0,15)
y = np.random.uniform(0.0,10.0,15)
datafile = 'lena.jpg'
img = plt.imread(datafile)
plt.scatter(x,y,zorder=1)
plt.imshow(img, zorder=0, extent=[0.5, 8.0, 1.0, 7.0])
plt.show()

caveat This requires you know where the image corners need to be!

sources:

Creating a pictogram

import matplotlib.pyplot as plt
from pywaffle import Waffle
data = {'Democratic': 48, 'Republican': 46, 'Libertarian': 3}
fig = plt.figure(
    FigureClass=Waffle, 
    rows=5, 
    values=data, 
    colors=["#232066", "#983D3D", "#DCB732"],
    legend={'loc': 'upper left', 'bbox_to_anchor': (1, 1)},
    icons='child', 
    font_size=12, 
    icon_legend=True
)
plt.show()

note:

PyWaffle supports Font Awesome icons in the chart. plotly is an alternative. Sources: - How to make a pictogram / icon chart?

Icons

Adding images to the axes of a plot

import numpy as np
import matplotlib.pyplot as plt
from matplotlib.offsetbox import OffsetImage,AnnotationBbox
def get_flag(name):
    path = "data/flags/Flags/flags/flags/24/{}.png".format(name.title())
    im = plt.imread(path)
    return im
def offset_image(coord, name, ax):
    img = get_flag(name)
    im = OffsetImage(img, zoom=0.72)
    im.image.axes = ax
    ab = AnnotationBbox(im, (coord, 0),  xybox=(0., -16.), frameon=False,
                        xycoords='data',  boxcoords="offset points", pad=0)
    ax.add_artist(ab)
countries = ["Norway", "Spain", "Germany", "Canada", "China"]
valuesA = [20, 15, 30, 5, 26]
fig, ax = plt.subplots()
ax.bar(range(len(countries)), valuesA, width=0.5,align="center")
ax.set_xticks(range(len(countries)))
ax.set_xticklabels(countries)
ax.tick_params(axis='x', which='major', pad=26)
for i, c in enumerate(countries):
    offset_image(i, c, ax)
plt.show()

Plot images at the end of a bar chart

import matplotlib.pyplot as plt
from iso3166 import countries
import matplotlib.image as mpimg

def pos_image(x, y, pays, haut):
    pays = countries.get(pays).alpha2.lower()
    fichier = "/usr/share/iso-flags-png-320x240"
    fichier += f"/{pays}.png"
    im = mpimg.imread(fichier)
    ratio = 4 / 3
    w = ratio * haut
    ax.imshow(im,
              extent=(x - w, x, y, y + haut),
              zorder=2)

plt.style.use('seaborn')
fig, ax = plt.subplots()
liste_pays = [('France', 10), ('USA', 9), ('Spain', 5), ('Italy', 5)]
X = [p[1] for p in liste_pays]
Y = [p[0] for p in liste_pays]
haut = .8
r = ax.barh(y=Y, width=X, height=haut, zorder=1)
y_bar = [rectangle.get_y() for rectangle in r]
for pays, y in zip(liste_pays, y_bar):
    pos_image(pays[1], y, pays[0], haut)
plt.show()

and a second solution which put the flag in the axes if the bar is too short.

import numpy as np
import requests
from io import BytesIO
import matplotlib.pyplot as plt
from matplotlib.offsetbox import OffsetImage, AnnotationBbox
def offset_image(x, y, label, bar_is_too_short, ax):
    response = requests.get(f'https://www.countryflags.io/{label}/flat/64.png')
    img = plt.imread(BytesIO(response.content))
    im = OffsetImage(img, zoom=0.65)
    im.image.axes = ax
    x_offset = -25
    if bar_is_too_short:
        x = 0
    ab = AnnotationBbox(im, (x, y), xybox=(x_offset, 0), frameon=False,
                        xycoords='data', boxcoords="offset points", pad=0)
    ax.add_artist(ab)
labels = ['CW', 'CV', 'GW', 'SX', 'DO']
colors = ['crimson', 'dodgerblue', 'teal', 'limegreen', 'gold']
values = 2 ** np.random.randint(2, 10, len(labels))
height = 0.9
plt.barh(y=labels, width=values, height=height, color=colors, align='center', alpha=0.8)
max_value = values.max()
for i, (label, value) in enumerate(zip(labels, values)):
    offset_image(value, i, label, bar_is_too_short=value < max_value / 10, ax=plt.gca())
plt.subplots_adjust(left=0.15)
plt.show()

Annotaions

Add outline arond flagged items in a plotly candlestick chart

import pandas as pd
import plotly.graph_objects as go
df = pd.DataFrame({"data_minu": ['30/10 09:00','30/10 09:05','30/10,09:10','30/10 09:15','30/10 09:20','30/10 09:25','30/10 09:30','30/10 09:35','30/10 09:40','30/10 09:45'],
                   "Open":['10','17','23','20','8','22','24','25','29','22'],
                   "High":['21','27','25','29','24','27','28','32','29','25'],
                   "Low":['6','12','18','9','5','8','24','18','15','10'],
                   "Close":['17','24','22','10','21','25','26','30','18','10'],
                   "Flag": ['0','1','1','1','0','1','1','1','0','0']})     
fig = go.Figure(data=[go.Candlestick(x=tickvals, #df['data_minu'],
                open=df['Open'], high=df['High'],
                low=df['Low'], close=df['Close'])
                     ])  
tickvals =[k*0.5 for k in range(len(df))]
ticktext=list(df["data_minu"])
fig.update_layout(xaxis_rangeslider_visible=False, xaxis_tickvals=tickvals, xaxis_ticktext=ticktext) 
for k, flag in  enumerate(df['Flag']):
    if int(flag):
        fig.add_shape(dict(type='rect',
                          xref='x', yref='y',
                          layer='below', 
                          x0 = tickvals[k]-0.2, y0 = float(df.loc[k, 'Low'])-1,
                          x1 = tickvals[k]+0.2, y1 = float(df.loc[k, 'High'])+1,
                          fillcolor='orange', #'RoyalBlue',
                          opacity=0.35))

scatterpolt with icons

library(rgdal)
library(png)

# load icons in PNG format
iconfile1 <- download.file('http://icons.iconarchive.com/icons/oxygen-icons.org/oxygen/256/Status-weather-clouds-icon.png', destfile = 'icon1.png', mode = 'wb')
icon1 <- readPNG('icon1.png')
iconfile2 <- download.file('http://icons.iconarchive.com/icons/oxygen-icons.org/oxygen/256/Status-weather-showers-scattered-icon.png', destfile = 'icon2.png', mode = 'wb')
icon2 <- readPNG('icon2.png')

# load shapefile
al <- readOGR("DZA", "DZA_adm0")

# make up some points
library(sp) 
set.seed(613) 
dat <- spsample (al, 3, type='random')

# need to offset the x/y location for the icon (depends on desired icon size)
offset <- 2
plot(al)
rasterImage(icon1, coordinates(dat)[1,1]-offset, coordinates(dat)[1,2]-offset, coordinates(dat)[1,1]+offset, coordinates(dat)[1,2]+offset)
rasterImage(icon2, coordinates(dat)[2,1]-offset, coordinates(dat)[2,2]-offset, coordinates(dat)[2,1]+offset, coordinates(dat)[2,2]+offset)
rasterImage(icon1, coordinates(dat)[3,1]-offset, coordinates(dat)[3,2]-offset, coordinates(dat)[3,1]+offset, coordinates(dat)[3,2]+offset)
points(dat)

Citation

BibTeX citation:
@online{bochman2021,
  author = {Bochman, Oren},
  title = {Python {Graphs}},
  date = {2021-08-29},
  url = {https://orenbochman.github.io/posts/2021/2021-09-16-python-graphs/2021-09-14-python-graphs.html},
  langid = {en}
}
For attribution, please cite this work as:
Bochman, Oren. 2021. “Python Graphs.” August 29, 2021. https://orenbochman.github.io/posts/2021/2021-09-16-python-graphs/2021-09-14-python-graphs.html.